
 And the table gets more colorful!
And the table gets more colorful!
And the table gets more colorful!

 Then I made a regular round cake, used Pirouline cookie wafers to decorate around, and topped with crushed Oreos to make the dirt.

 All Halloween Party ready.

 *Note that I used a small eggplant to help me shape the round part of the skull.
It took about 2 days to dry.
After perfectly dry, I gently sanded around, then in the end painted with silver paint. I used Martha Stewart's Metallic Paint.
*Note that I used a small eggplant to help me shape the round part of the skull.
It took about 2 days to dry.
After perfectly dry, I gently sanded around, then in the end painted with silver paint. I used Martha Stewart's Metallic Paint. I used a foam constructor's hat from Michaels, and cut around the wings to make it smaller. Then using hot glue gun, I glued the feathers individually, all the way leaving space in the front, to glue the skull.
 Then using the hot glue gun, I attached the skull to the hat and finished placing more feathers to hide the yellow part of the hat.
 Previously I made the eyes, using Fimo clay, and using resin on top.
 The legs were also made from Fimo clay, and painted in gold craft paint. After dries, I glued to the sides with hot glue gun.
 After all together, is all make up and fun.


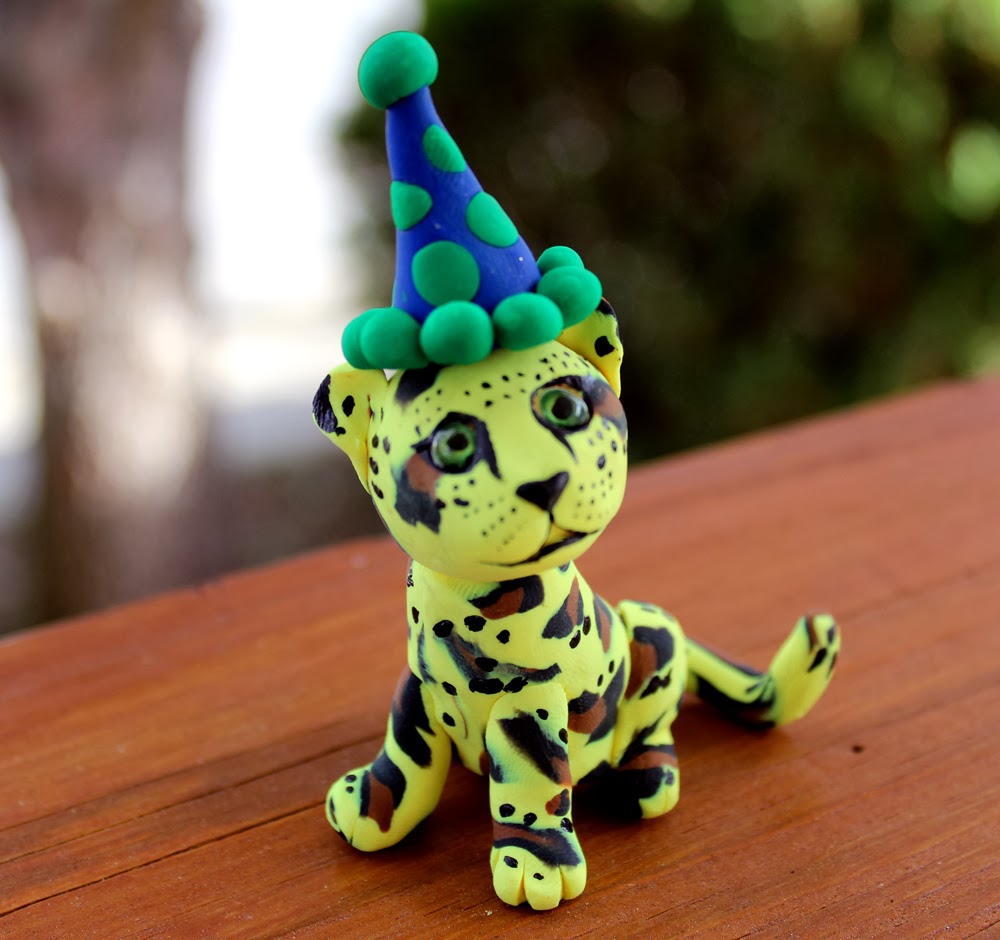
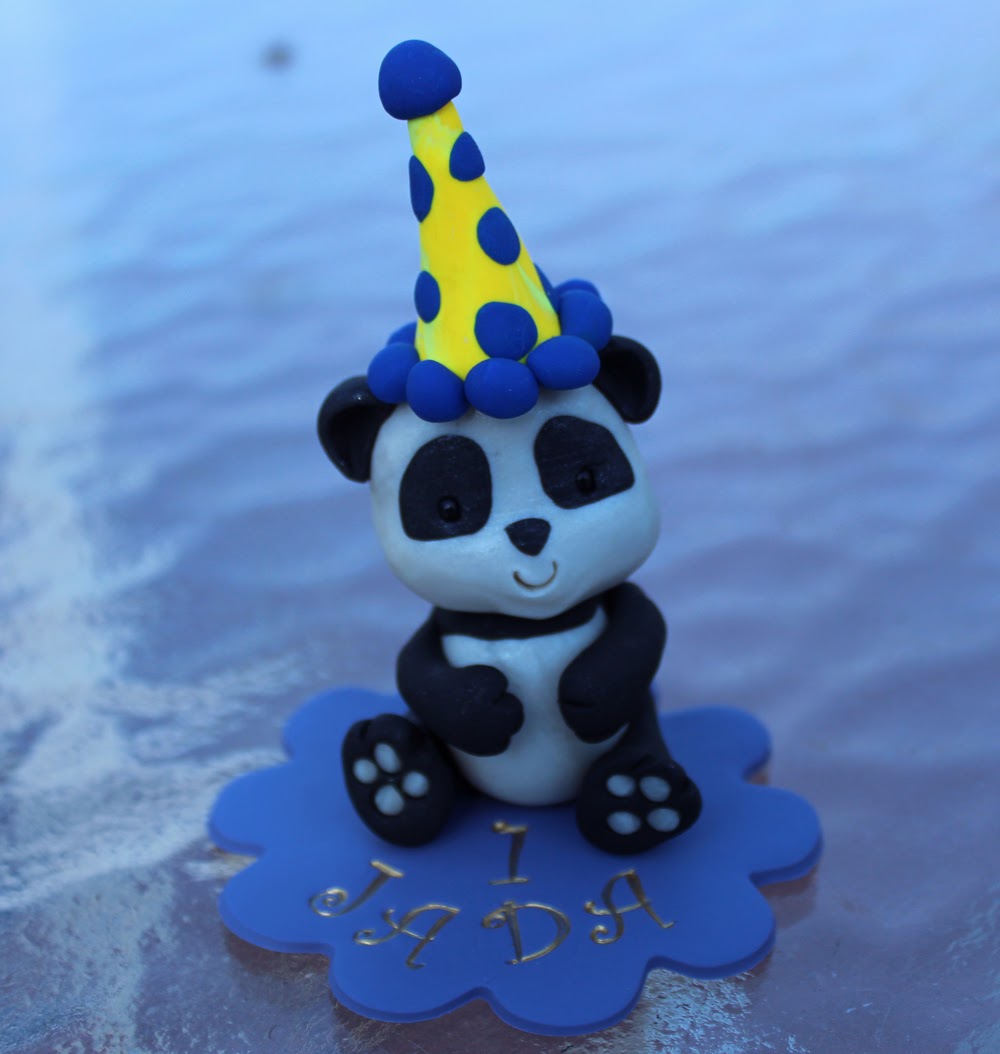
 My favorite thing to make in the whole world is little party favors for a baby birthday. So when baby Jada's mom, Serena, contated me to make her party favors, I was beyond excited! Her party will be at the Bronx Zoo, and how great to give me a chance to make little animals. My imagination was getting low in battery after I finished a few of them, but after looking at some kid's books, is always easy to get some inspiration. And with each figurine completed, it gave me such a satisfaction that they would make a more colorful table, in such a special day.
Happy birthday beautiful Jada, thank you Serena!
My favorite thing to make in the whole world is little party favors for a baby birthday. So when baby Jada's mom, Serena, contated me to make her party favors, I was beyond excited! Her party will be at the Bronx Zoo, and how great to give me a chance to make little animals. My imagination was getting low in battery after I finished a few of them, but after looking at some kid's books, is always easy to get some inspiration. And with each figurine completed, it gave me such a satisfaction that they would make a more colorful table, in such a special day.
Happy birthday beautiful Jada, thank you Serena!


 . To make the front glass part, I cut a plastic disposable container and glued with hot glue.
To make the eyes, I just cut white paper and painted the eyeballs, and glued in the hat.
. To make the front glass part, I cut a plastic disposable container and glued with hot glue.
To make the eyes, I just cut white paper and painted the eyeballs, and glued in the hat. In the end the lids were glued to make the glasses, and black paper to make the straps.
With the help of my husband, we put little lights on top of the hat, connected with a small battery inside. Then I found little plastic cups at Party City to make it look like an ambulance light.
In the end the lids were glued to make the glasses, and black paper to make the straps.
With the help of my husband, we put little lights on top of the hat, connected with a small battery inside. Then I found little plastic cups at Party City to make it look like an ambulance light.

 .
But the real lights are not required, just used them because we had them at home.
For the rest of the costume, I went to Old Navy and found a yellow shirt and jeans ,that still can be used after Halloween. Since I could not find overalls, I cut a piece of old jeans to make the top part, and painted the letter "G" like the Minions have, using Puffy Paint.
.
But the real lights are not required, just used them because we had them at home.
For the rest of the costume, I went to Old Navy and found a yellow shirt and jeans ,that still can be used after Halloween. Since I could not find overalls, I cut a piece of old jeans to make the top part, and painted the letter "G" like the Minions have, using Puffy Paint.
 And that it is, very simple, and the kid is happy. And not a lot of money spent.


 After assembled, I used white buttons for the eyes, then used black puffy paint for the black part of the eye and mouth.

 And there it is, Fluffy the stegosaurus.

 This year my husband played gardener, and it was surprising to see how the vegetables grew. According to the books from the library he read, the secret is good amount of Sun (at least 6 hours a day), good irrigation (he purchased a timer and watered the plants twice a day), fertilizer, and a good local nursery that sells the plants adapted to your area's climate. So after a few weeks, we were able to collecting potatoes, tomatoes, eggplants, lettuce, watermelon and strawberries( in a very limited space).
So when too much of the same thing was growing, we started to give them away.
But who wants to get a head of lettuce, tomatoes and strawberries in a plastic bag? So I wrapped them in clear plastic and tissue paper, and made a nice bouquet. It is a multi purpose gift, because it is a beutiful bouquet, that can fill your plate, that fills your stomach, that gives you plenty of nutrients, and it is organic. Like the idea but don't have a garden? Just go to the grocery shop and make your own salad bouquet.
I bet it is going to impress anyway.
This year my husband played gardener, and it was surprising to see how the vegetables grew. According to the books from the library he read, the secret is good amount of Sun (at least 6 hours a day), good irrigation (he purchased a timer and watered the plants twice a day), fertilizer, and a good local nursery that sells the plants adapted to your area's climate. So after a few weeks, we were able to collecting potatoes, tomatoes, eggplants, lettuce, watermelon and strawberries( in a very limited space).
So when too much of the same thing was growing, we started to give them away.
But who wants to get a head of lettuce, tomatoes and strawberries in a plastic bag? So I wrapped them in clear plastic and tissue paper, and made a nice bouquet. It is a multi purpose gift, because it is a beutiful bouquet, that can fill your plate, that fills your stomach, that gives you plenty of nutrients, and it is organic. Like the idea but don't have a garden? Just go to the grocery shop and make your own salad bouquet.
I bet it is going to impress anyway.

 So between coffee breaks, toilet visits, feeding the kids, I completed my elephant way before we crossed the border. And the weather went from rainy and gloomy to beautiful and sunny, as we traveled north.
 These little crochet animals called Amigarumi are great to make, because being small, they take less time to make, less yarn to use, and can be finished before your hands start to cramp.
 And before the trip was ended, an elephant was made, and I could still enjoy and see the scenery.
 And the kids had fun as they saw Elephante being made, crossing the Canadian border, and take him to see the beautiful view of Niagara Falls.

